THE LOVE BUTTON
Which Essential Oils to Enhance Sexual Intimacy?
This post is contributed by One Drop member – Connie Chua
Hi! Thank you again for visiting my blog. You may want to visit my previous post as this is part 2 of enhancing sexual intimacy.
As promised, I will now share how learning about the specific essential oils from Young Living and the love button has helped moved up a notch in our intimacy level after 20 years in our marriage! I will do my best to share as openly as I can without being overly explicit. It is after all a very private intimate level and yet I know many of you who are reading this will benefit from my sharing.
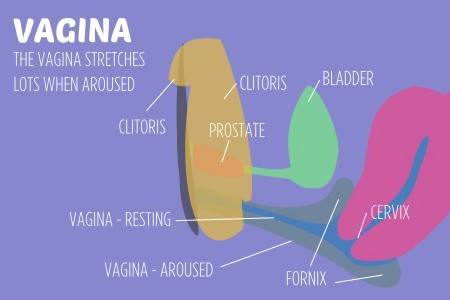
Firstly, knowing where your love button is located is of vital importance when you want to reach that peak. It is actually part of the female sexual organ called clitoris. This is highly sensitive to arousal and it has been found to serve no other purpose except for sexual pleasure! The tip of the love button is very similar to the tip of a penis but with more than 8000 nerve endings! As you can see in the picture below, it looks as small as a pea behind the labia, while the rest of it is covered underneath the clitoral hood and inside the vagina. Upon physical touch like petting, blood circulation around the area is increased and it protrudes even more as the vulva opens up when more blood rushes in.
To quicken the blood flow so that the area becomes engorged, simply apply cypress essential oil diluted with vegetable oils like v6 oil, olive oil, coconut oil or sweet almond oil near the pelvic area. You may want to put 2 drops onto your palm and massage along the inner thighs towards the crease of the legs. It would be good to prepare a bottle of diluted cypress oil beside the bed for convenience. Time to slather it on each other’s thighs and feel the adrenalin flowing in!
If you have made the oily potion that I’ve suggested in the previous post, you may want to apply them instead. With greater blood flow being circulated around the vagina, touching the love button now will most likely lead to a great sense of euphoria! Yes, I kid you not! By now, the clitoral hood which covers the love button would have been retracted and thereby made the love button more accessible. This is also known as clitoral erection.
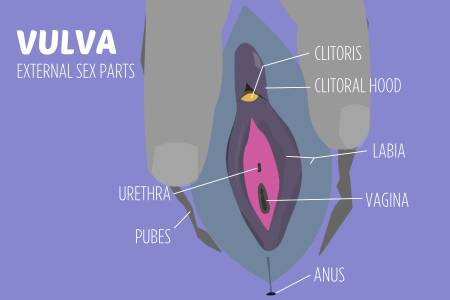
As the vulva swells and prepares itself to receive the penis, the vagina gets wetter, more stretchy and relaxed. This eliminates the discomfort and sometimes painful intercourse if the woman has not been aroused long enough. The husband really should take the time to stimulate the wife by using the above suggested techniques. Maybe let the wife lead the husband as they will find greater sexual fulfillment when both learn to tango on the bed. In my opinion, forget about finding the G-spot which is hidden further deep inside the vagina. Stimulating the love button is much easier and many women have found themselves climaxing faster without trying to locate the elusive G-spot.
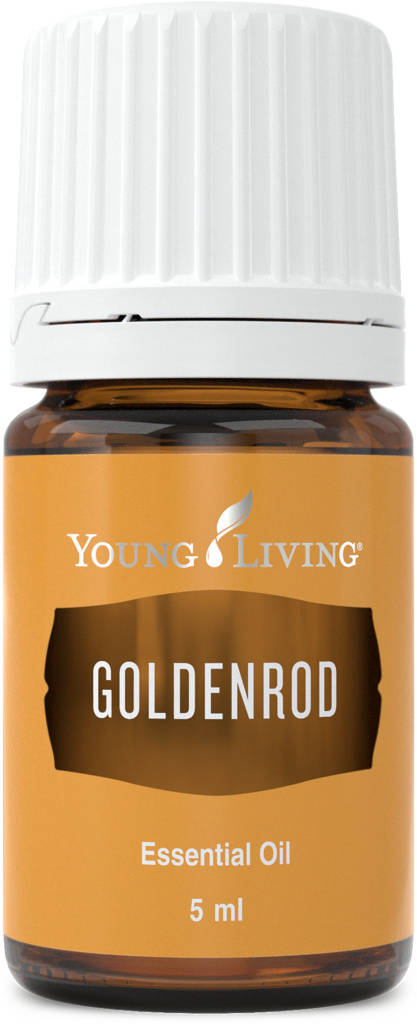
“But what if the husband is not able to sustain the erection long enough before the wife reaches a climax?” You may wonder. Try applying Goldenrod essential oil onto his love stones a.k.a. his testicles. Just never on the snake eye. DON’T. DO. THAT. EVER. Or that may spell the end of a sensual night. You may instead apply Idaho Blue Spruce regularly onto his outer ankles to boost his testosterone level. Adding 60ml of Ningxia Red as daily supplement will also increase his energy level and may help his “soldier” to stay firm for a longer period.
I sincerely hope the above sharing will be helpful for you and your spouse. Remember that physical oneness has to be intentional as well as being loving. Adding the essential oils have greatly enhanced my intimacy level with my husband and it is my desire to help you achieve that, too, with your spouse. E-mail me or contact your friend who has introduced you to Young Living Essential Oils if you need further explanation.
Connie is a member of OneDrop. She and her team supports oil users via their website. If you like Connie’s articles and would like to purchase the Young Living oils, please feel free to get in touch with Connie via email or sign up directly here.

OILING MY CHILD PART 1
This post is contributed by One Drop member – Faith Teo
PART ONE – IS THIS OR THAT OIL SUITABLE FOR MY BABY / YOUNG CHILD?
I’m often asked, sometimes to the point of daily…
“Can I use this oil on my baby? Is it safe????”
“How can I use the oil?”
So I thought that I would write a post to address this and allay parents out there, especially the new oilers. 
You have heard testimonials from your friends or even from websites or social media on how good the oils are, how they have helped to support children’s health and so you eagerly buy some… only to realise now you have a lot of doubts as to WHAT TO USE, HOW TO USE and IS IT SAFE? Doubts assail you and it seems like oiling is mind boggling and you feel discouraged.
So let’s talk about YOU as an oiler. Are you open to trying different oils or do you only want to stick to a few oils that are pretty gentle for young ones?
In my humble opinion, you can use MOST oils on your babies and kids. There isn’t really a definition on which are “baby and kid safe” and which are “not”. The ones I tend to skip for my kids (they are age 1 and 4) are the oils / products that work on their hormones. Again this is my opinion and comfort level, and not a fact. 
HOWEVER if you are a parent that wants to take a SUPER DUPER CONSERVATIVE approach to oiling (I totally understand, I was there before) because you are new or you want to take it slow and cautious, then I will recommend THREE oils per category that are excellent for babies and kids. There’s actually so many more I could name but I will keep it simple for easier remembering.
RESPIRATORY – Myrtle, Frankincense, Balsam Fir
IMMUNITY – Frankincense, any citrus oils, DiGize
SKIN – Lavender, Frankincense, Melrose
DIGESTION – TummyGize, DiGize, Lavender
SLEEP – Lavender, Peace and Calming, Frankincense
My own favourite 3s currently (which include a mix across the board because I take a balanced view in oiling)
RESPIRATORY – Myrtle, Eucalyptus Radiata, Pine
IMMUNITY – Frankincense, Immupower, Thieves
SKIN – Helichrysum, Frankincense, Melrose
DIGESTION – DiGize, Aroma Siez, Life 5 (probiotics)
SLEEP – Tranquil, Peace and Calming, Lavender
Again, I do use a lot more than these listed but well just to keep things simple. 
PART TWO – How and where to apply, diffusing durations and diluting ratios.
https://www.onedrop.sg/oiling-my-babykid-pt-2/
https://www.onedrop.sg/oiling-my-babykid-pt-2/
PART THREE – How frequent can I oil my baby / child?
https://www.onedrop.sg/oiling-my-babykid-pt-3/
https://www.onedrop.sg/oiling-my-babykid-pt-3/
Faith is a member of OneDrop. She and her team supports oil users via their facebook group – Let’s Add Oil and their blog – School of YL. If you like Faith’s articles and would like to purchase the Young Living oils, please feel free to get in touch with Faith or sign up directly here.

OILING MY CHILD PART 2
This post is contributed by One Drop member – Faith Teo
PART TWO – I AM NEW TO THE OILS AND I WANT TO OIL MY BABY / KID BUT I HAVE THESE QUESTIONS….
1. HOW and WHERE to APPLY
2. DURATION AND AMOUNT to DIFFUSE
3. DILUTION RATIOS
2. DURATION AND AMOUNT to DIFFUSE
3. DILUTION RATIOS
So it sounds like yesterday’s post about whether this oil or that oil is safe for our kids resonate with a lot of folks here…
If you haven’t read that, click here – https://www.facebook.com/groups/letsaddoil/permalink/513885348804077/.
Aaaannnd let’s continue! 
1. HOW and WHERE to APPLY
Let’s keep it simple simple simple. You only need to remember TWO tips from me.
FIRST TIP:
If you are applying, WHICH PART of the body do you want to work on? If its a respiratory condition, then it’s the lungs and you apply where the lungs are at – CHEST and BACK.
SLEEP? Well that is the brain yes? So you apply on the forehead and scalp. Rims of ears too if you like.
GROWING PAINS? Where is the growing pains at? Apply there. Simple? Yes it is that simple.
SLEEP? Well that is the brain yes? So you apply on the forehead and scalp. Rims of ears too if you like.
GROWING PAINS? Where is the growing pains at? Apply there. Simple? Yes it is that simple.
SECOND TIP:
If you get flustered on where to apply, then just oil the soles. The soles is a mirror of our bodies (Google “foot reflexology” then click Images).
Some examples:
Your hubs SNORE and you want to kick him out of the bed. You hear that THYME works but well its a hot oil and you probably are too kind to apply it on his face. What do you do? Answer: Rub it on his soles.
Your baby. She’s so young and so delicate. You worry that the oils may be too potent for her skin. However SOLES are thick and fleshy and have LARGE PORES. So rubbing oils on her soles would be wonderful for her.
Ok here comes the TRICK QUESTION! What if you want to work on your child’s immunity? Where do you apply? After all, there is no “immunity organ”.
Usually when a person is under the weather, the unwelcome guests first reside in the SPINE of the body. So yes please oil the spine or again, if you want to keep things SUPER SIMPLE, just oil the soles ALL THE TIME.
How about temperature management? Well, how about oiling where it feels hot? 
2. DURATION AND AMOUNT to DIFFUSE
Moms tend to go into worry mode when they see this on the bottle – “Diffuse up to 10 mins 3 times a day.” The diffusers we use tend to go up to a few hours and IS THAT TOO MUCH FOR MY KID???
My answer – the directions you see is for the YL USA Therapro diffuser. Therapro works like the AromaLux that we have in Asia, where it DIFFUSES DIRECTLY from the bottle. No water. Just spraying EO neat into the air.
Because it’s pretty potent, the label recommend 10 mins. And labels also tend to go conservative… well they have to, from a legal standpoint, you know what I mean? 
So let’s talk about the usual diffusers that most people use, which tend to be water based, such as the Dewdrop diffuser.
And now, we apply a bit of Common Sense and take a look at the instruction manual which says 100 ml of water to diffuse 5 to 8 drops of EO into a room….
In my humble opinion, this is the gentlest way to introduce an eo to a little one because firstly there is water involved and secondly the drops of EO is SPREAD AROUND in the room.
However if you are worried or want to go CONSERVATIVE, I’ve TWO tips for you:
FIRST TIP:
Cut down the amount of EO used. How about going down to just 2 to 4 drops for 100 ml of water? You can also cut down on the duration diffused too.
SECOND TIP:
You can apply the EO on yourself and then spend time with baby. Parents are the BEST diffusers for their kids!
3. DILUTION RATIOS
So I do get a lot of “How much eo can I apply?” “Neat or diluted?”
Ok so let’s keep it simple for everyone to remember…. ONE DILUTED DROP TILL AGE 3.
This is not a hard and fast rule though. I have done neat for Ju when she was younger. I have done neat for Sol but realized that his skin gets rashes quicker. But if you are new to oiling, why not start with this first then adjust as you go along?
Perhaps you might have a kid who don’t respond quickly enough to heavily diluted oils and so you dilute lesser. Perhaps you have a baby whose skin turn red and bumpy if you try neat. Go slow go gentle first and adjust along the way.
DILUTION RATIOS? A simple way I remember my dilution is that I remember the ratio of 80%. That means I go 20% EO and 80% carrier oil. And well you will see various websites recommending different ratios but for simplicity, this is what I use.
In practical terms, it’s about 1 drop eo to 1 teaspoon of carrier oil. OR you can take an empty 15 ml bottle, drip 20% eo into it then top up with carrier oil.
MY CHEAT TIP:
Because I hate fussing with oily carrier oils, this is how I oil my babies WITHOUT BLENDING carrier oils and EOs together.
- I take a drop of EO and rub my palms together for a couple of seconds. The drop becomes lesser since it is first absorbed into me.
- I apply what’s remaining on my child. I then take 1 to 2 drops carrier oil (I use an empty eo bottle and put in carrier oil for easier usage) and apply on him. Done!
If I have to oil 3 different EOs on him, I go EO 1, EO 2, EO 3 then carrier oil.  🙂
🙂
I hope this post helps! Drop me a comment if you have any questions or just to let me know whether this post is useful. Have a wonderful day!
PART ONE – Is it safe to use this or that oil on my baby / kid?
https://www.onedrop.sg/oiling-my-babykid-pt-1/
https://www.onedrop.sg/oiling-my-babykid-pt-1/
PART THREE – How frequent can I oil my baby / child?
https://www.onedrop.sg/oiling-my-babykid-pt-3/
https://www.onedrop.sg/oiling-my-babykid-pt-3/
Faith is a member of OneDrop. She and her team supports oil users via their facebook group – Let’s Add Oil and their blog – School of YL. If you like Faith’s articles and would like to purchase the Young Living oils, please feel free to get in touch with Faith or sign up directly here.

OILING MY CHILD PART 3
This post is contributed by One Drop member – Faith Teo
PART 3 – FREQUENCY – HOW OFTEN CAN I OIL MY BABY / KID?
So besides the common questions of “is this safe?” and “how can I apply / diffuse?”, the last question I am often asked is “how often can I apply on my child?”.
So here are my suggestions. 
PHYSICAL HEALTH
Say your baby or child is under the weather and you are the ever loving and concerned parent wants her to get better ASAP. How often should you oil?
I have oiled my kids for 4 years now from newborn and have tested from the frequency of three times a day (well this was when I was pretty new to oiling), to 3 times an hour (every 20 mins) to 6 times an hour (every 10 mins) to non stop oiling for under 1 hour. And these are my conclusions:
- When my child is well and I want to support her immune system, I would oil 1 to 2 times a day. For example, Thieves and Immupower on her soles before and after school.
- When my child is STARTING to show signs of being unwell, the oils are very effective when I DON’T PROCRASTINATE and oil every 20 mins for a few hours. RULE OF THUMB? Little but often is BEST.
- When my child is stuck with something persistent, oiling between every 10, 15 or 20 mins for half a day would tend to improve the situation. Anything LESSER than that, and sigh I will be in for a long ride over the next few days.
- There are only 3 times in my 4 years of being a mother that I have to oil continuously for an hour.
The first time was when Ju was transitioning to solids as a 1 year old and was stuck with horrible constipation. Her worst record was 4 days without pooping and she was in a lot of discomfort. So I stripped her down to her diapers, we watched TV and I oiled her on and on and on until she POO-NAMI! I didn’t even mind cleaning up the mess! 
The second and third time, while I cannot say for compliance, what she had, but it was urgent and critical at that time. I didn’t want to risk her health and was prepared to send her to the hospital if I couldn’t shift it within the hour. I was using oils to support her immune system and manage to shift her to a better state after 40 mins non stop oiling.
EMOTIONAL BALANCE
Your kid has been throwing tantrums at home… or refusing to do his homework…. or having some fears about school so what are your options? (Please note that the oils are not a replacement for you as the parent to talk things out with your child!)
1. REACTIVE OILING
Tantrums! Anger! Quarrels! Quickly drip the oil of your choice out and apply anywhere on your child. He probably will hate it but it may help defuse the situation.
Can’t reach him? Apply on yourself or use your hands to sprinkle the eo in the air.
2. PROACTIVE OILING
It’s homework time and uurgh you know it’s gonna be a uphill battle with your kid. You can choose to apply on him in advance or just set up a diffuser near him. I usually diffuse Harmony or Peace and Calming in the kitchen / dining room cos family squabbles tend to break out during meal prep and meals.
3. STATE MANAGEMENT
Say your child has a phobia over Maths. And you would like him to shift into a state that have him be open to learning and perhaps even improving his grades on it. In this case, I would oil him twice a day… perhaps before school and before homework would be ideal.
MY TIPS AROUND FREQUENCY:
i. Always offer water to your child. If she’s completely breastfed and has not taken solids, offer breastmilk. The body needs fluids to assist the oils to do their work.
ii. If you are a new oiler, choose a frequency that feels comfortable to you. You can always tweak it less or more as you go along.
iii. Observe your child. Any progress? Yes? Continue at same frequency. No? Then you have 2 options – switch oils and/or change frequency.
Oiling is an amazing thing… it strengthen the bond between parent and child and help parents to develop a 6th sense of what oils will help their kids.
I hope this helps! Drop me a comment below if you have any feedback or questions. 
PART ONE – Is it safe to use this or that oil on my baby / kid?
https://www.onedrop.sg/oiling-my-babykid-pt-1/
https://www.onedrop.sg/oiling-my-babykid-pt-1/
PART TWO – How and where to apply, diffusing durations and diluting ratios.
https://www.onedrop.sg/oiling-my-babykid-pt-2/
https://www.onedrop.sg/oiling-my-babykid-pt-2/
Faith is a member of OneDrop. She and her team supports oil users via their facebook group – Let’s Add Oil and their blog – School of YL. If you like Faith’s articles and would like to purchase the Young Living oils, please feel free to get in touch with Faith or sign up directly here.

AGILEASE FOR JOINT HEALTH
This post is contributed by One Drop member – Jonathan Teo
SUPPLEMENTS CHALLENGE! – AgilEase
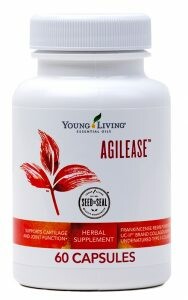
It’s pretty amazing that at the age of 40, I still thinks like I am in my 20s. Recently, a superbly energetic mummy has been jioing (inviting) fellow parent/s to go badminton and I am so happy to be invited! Time to show off my badminton skills! (FYI, last played 17 years ago…. I think) So as usual, I would play hard in any games, very hard. Generally I would recover from the weariness of my muscles after an hour or two of the badminton games, however it gets pretty exciting the next morning. There would be acute soreness at the ball of my heels and my knees will go on strike~!
This time round, I started using AgilEase as directed, twice a day and it supported by joints wonderfully. First morning step (without the soreness on my heels) that sets up for a great day ahead (picking up toys, carrying the kids, walking to the market etc.) with knees working like a fully lubricated smooth gear-works. For best results are found 6 weeks of continuous usage!
So what’s the key ingredients in AgilEase?
Frankincense resin powder, UC-II collagen, Calcium fructoborate, proprietary essential oil blend of Wintergreen, Copaiba, Clove, and Northern Lights Black Spruce.
So what’s the benefits and features of AgilEase?
Supports and protects joint and cartilage health.*
Beneficial for athletes and active individuals of all ages who want to support and protect their joints and cartilage.*
Perfect companion to an active lifestyle, promoting healthy joint function and supporting cartilage health.*
Supports the body’s response to acute inflammation in healthy individuals.*
Helps support healthy joint flexibility and mobility.*
Formulated with ingredients and essential oils for healthy joint support.*
Helps ease acute joint discomfort to improve quality of life.*
P.s. For those like me who has problem swallowing capsules, the taste of the crushed AgilEase capsule actually taste not bad! Mix with water and down it goes. 
*These statements have not been evaluated by the Food and Drug Administration. Young Living products are not intended to diagnose, treat, cure, or prevent any disease.
Jonathan is a member of OneDrop. He and his team supports oil users via their facebook group – Let’s Add Oil and their blog – School of YL. If you like Jon’s articles and would like to purchase the Young Living oils, please feel free to get in touch with Jon or sign up directly here.


